20 DIY Toy Box Ideas And Plans in 2026
Have you ever looked around the kids’ room or playroom and just groaned over the chaos? Yes, we see those hands. Well, these toybox ideas and plans are a great way to decoratively and functionally solve the mess issue.
Most of the projects are pretty easy to build if you’ve got the right tools. Some are great ways to upcycle existing options that may not be in the best shape. You should find something in your skill range.
Soft Closing Toy Box
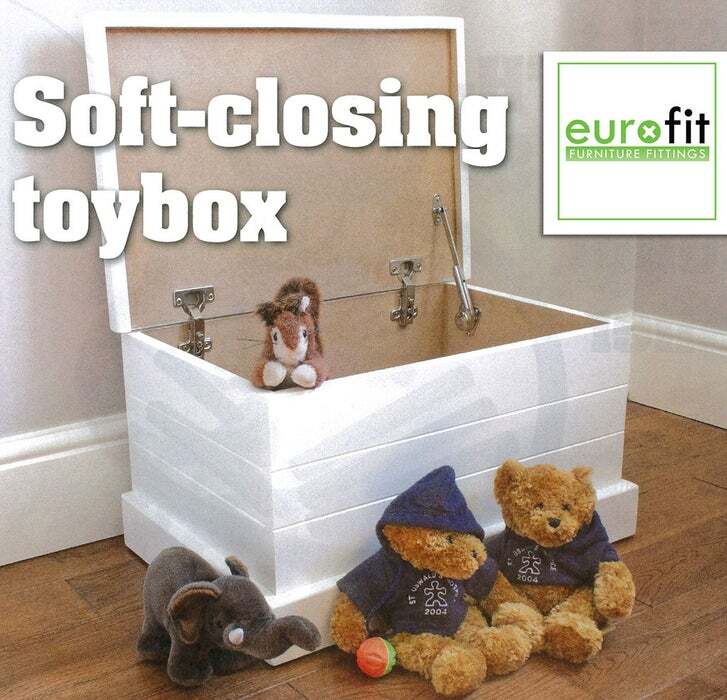
If you’ve got kids you just don’t think will remember to close their toybox, this is a great option. It’s a soft-closer, so no slamming, either. It’s an elegant choice that can sit in the living room, kids’ playroom, or anywhere.
You’ll need some wood, lid stays, heavy casters, chipboard screws, concealed hinges, and a large D handle to make this beautiful box. And as to tools, you’ll need a hinge hole cutter, a drill, and other basic supplies.
Via Instructables
Wild Animal Cage Toy Box
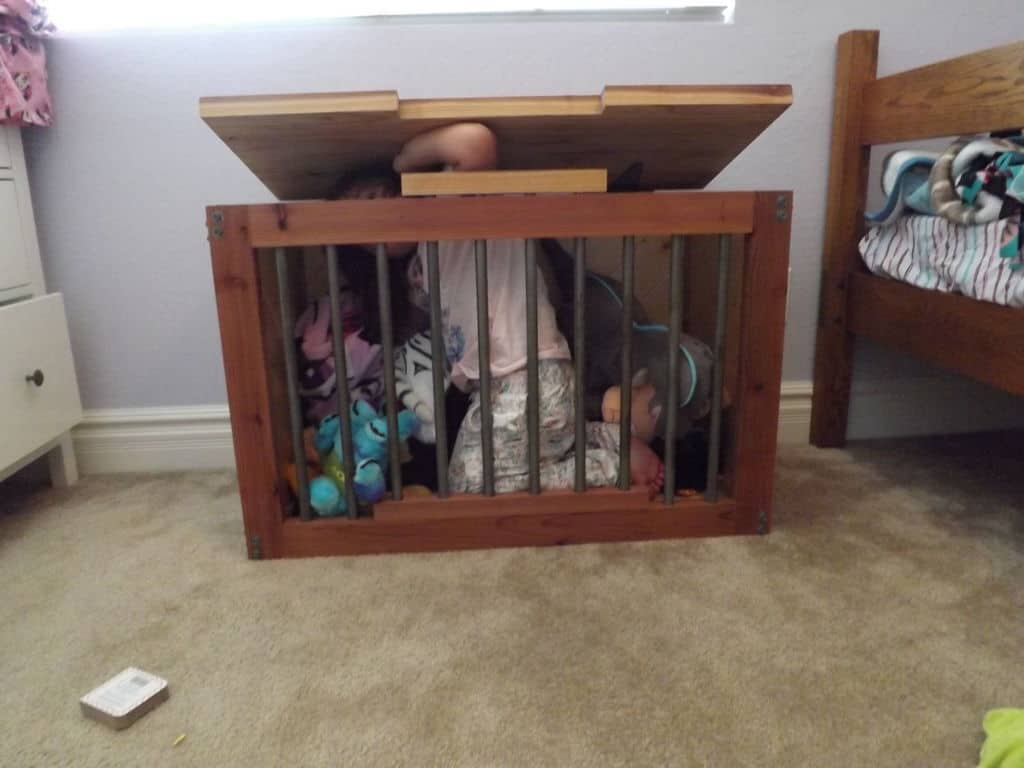
If your playroom is full of wild stuffies, you may want to get them under control through making this awesome and fun toy box your kids will love playing with and in, not just keeping their tigers, and lions, and bears in. It’s perfect for a zoo-themed room.
You’ll just need some wood, screws, washers, conduit, and basic tools to make this awesome toy box. Just collect together the materials first and follow the highly illustrated tutorial.
Via Instructables
Toy Bin Storage Center
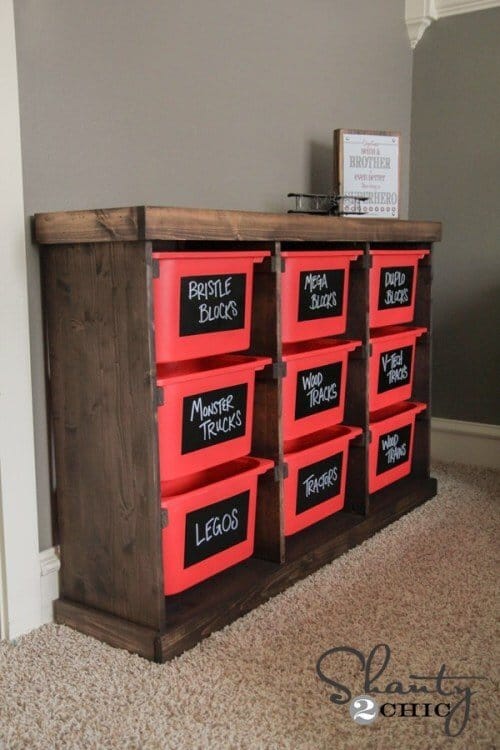
If you want a really well-organized toy center, this is a perfect choice for you. You’ll build a bin center that keeps everything in its place through the use of plastic bins labeled according to contents. The center can help your kids learn how to organize their own things, too, which makes it a real winner.
You’ll need some pine boards, some Ikea Trofast bins – or similar – a Kreg Jig, drill, brad nailer, Gorilla wood glue, and wood stain. The instructions are clear, direct, and easy enough to follow that most folks can do it.
Via Shanty 2 Chic
Pirate’s Treasure Toy Chest
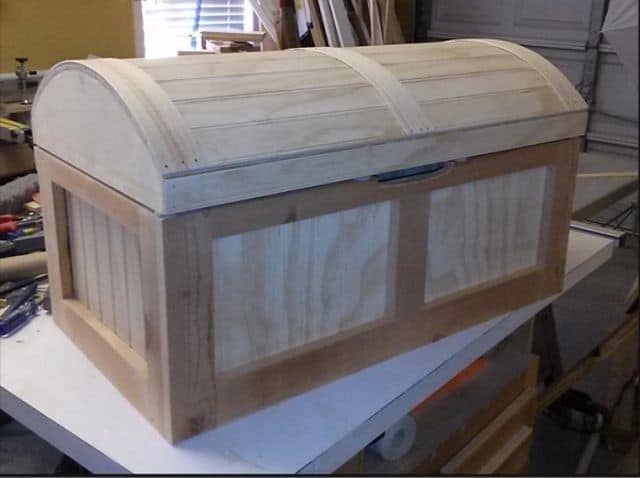
For those who love a good yarn, this pirate’s treasure chest toy bin is the perfect addition to the playroom. The simple, straightforward design is fun, easy, and basic enough that most people can put together through following the basic instructions.
You’ll need some lumber and basic tools – including a table saw and miter saw – and a few hours to build. The tutorial is on a PDF for an easy download, so be sure to read it through a few times before you get started.
Via Chiefs Shop
Toy Storage Console with Rolling Bins
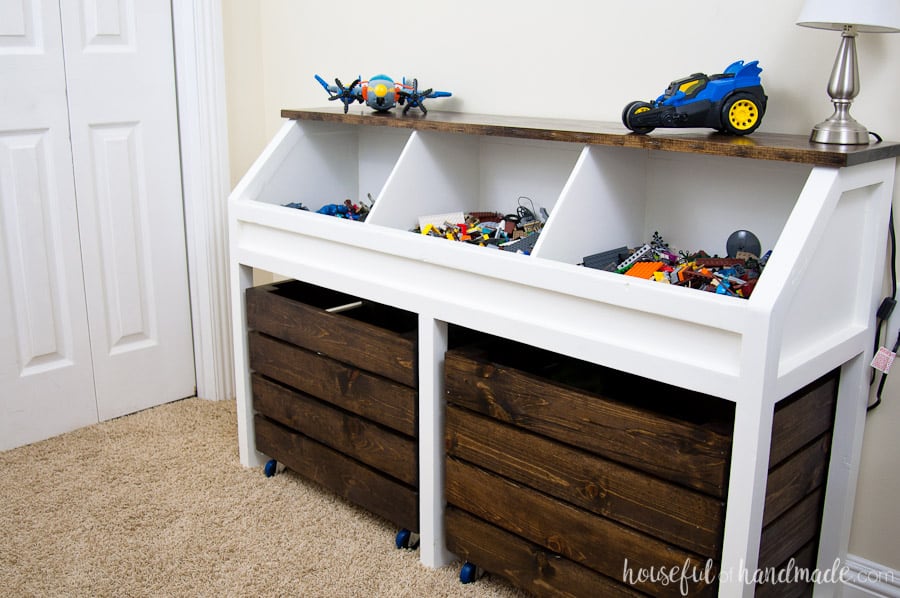
This console is a beautiful option for the family that wants easy access and great organization in their play area. The console has three large openings on the top for smaller toys like cars, small dolls, et cetera. And beneath there are two large rolling bins for larger toys.
Overall, it’s a rustic toy console made from some plywood, boards, screws, and castors. Just follow the clear, easy-to-follow plans, and in no time you’ll have this fantastic option for your home.
Via Build Something
Simple Wood Toy Chest
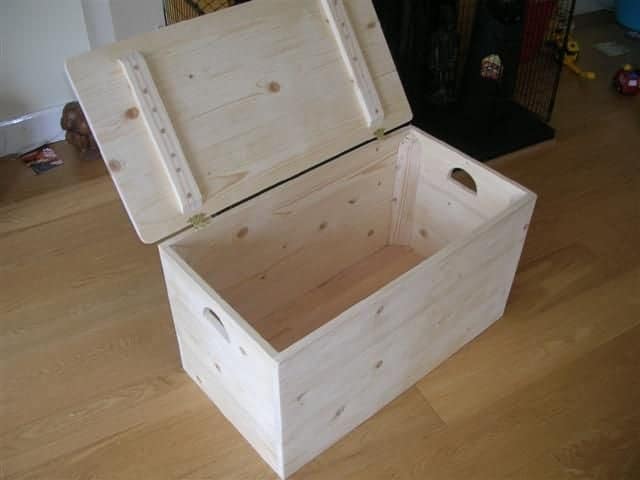
This is the perfect project for the less handy person who’s dying to get started with woodworking and needs something really practical and fun. It’s a simple toy box that you can construct easily in a single day, and you don’t need a load of fancy tools for it.
You will need whatever wood you like best, a miter saw or skill saw, a Jigsaw, biscuit cutter, sander, and drill, plus some basic supplies like a pencil, tape, and screws.
Via Instructables
Bookcase With Toy Storage
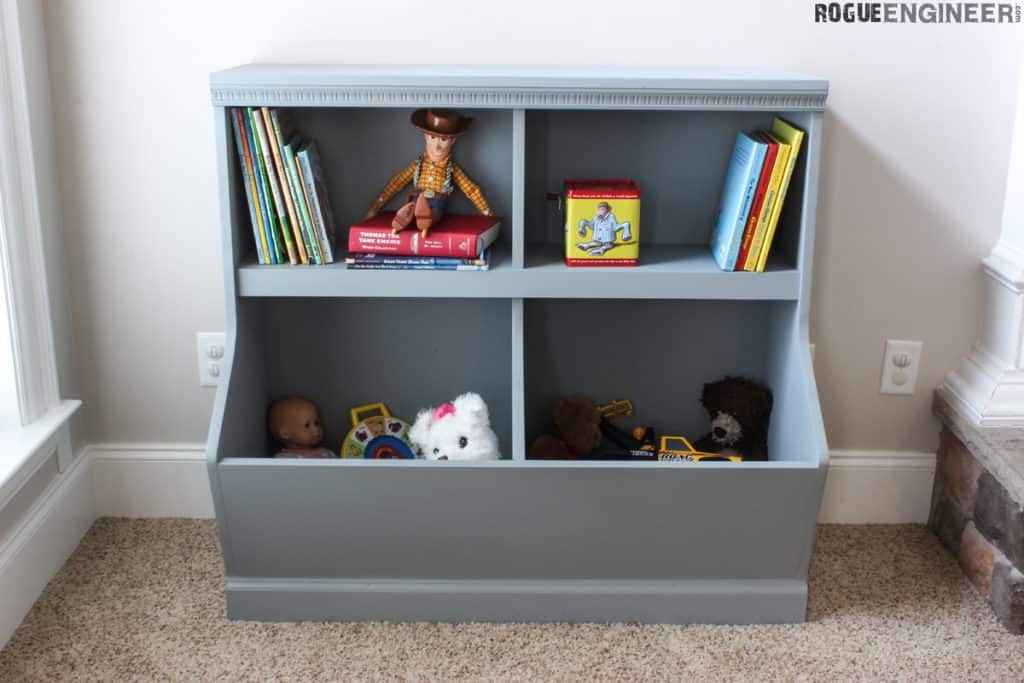
This is the perfect toy storage unit for the family that reads. It’s got enough shelves to keep current reading books out in the playroom and keep the toys in order below in the storage chest.
You can download the PDF for the tutorial, then grab some plywood, baseboard trim, brad nails, pocket screws, and some decorative molding. In a few hours, you’ll have this fantastic toy box/bookshelf in order, ready to paint.
Via Build Something
Stackable Toy Box
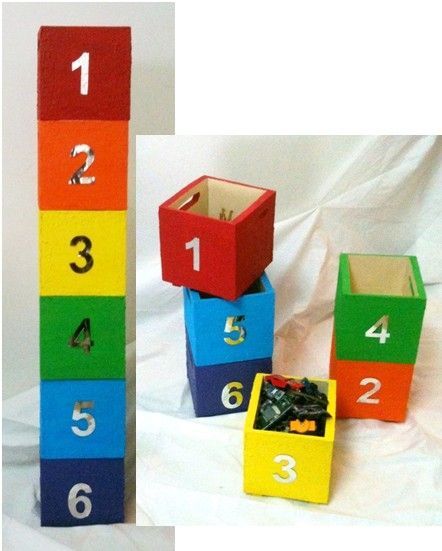
This fun toy box option is totally customizable for the number of toys your kid has. You start at one and go up from there. Then just stack them up and you’re all taken care of. Plus, if they aren’t too full of heavy toys, they actually become a toy themselves that your kids will enjoy stacking and using.
The instructions are very basic and give more of an “idea” of how to do it, but they offer some links to specific ideas for texturing the boxes, etc.
Via Instructables
Humvee Toddler Bed with Toy Box
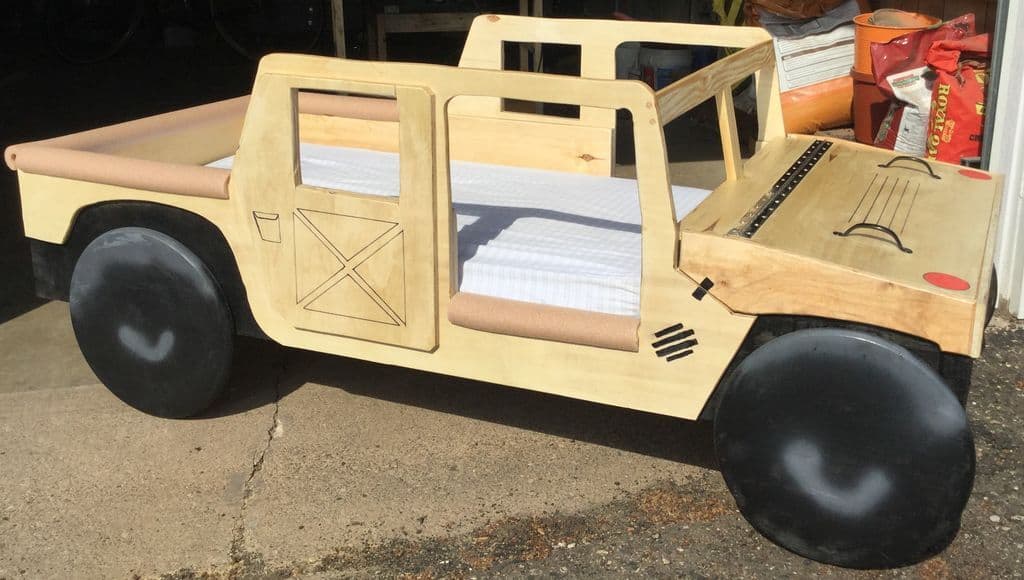
If you want a two-in-one option for your toddler’s room, this is the perfect choice for car lovers. It’s a bed and toy chest in one, wrapped up in a cute package. It’s absolutely adorable and totally functional.
And it’s not that crazy hard to build. You just need access to some basic cutting tools and other common supplies. You’ll need some plywood, hardware for the toy chest lid, some wood glue, paint, and finisher. You can print out the full-scale PDF for the cutting templates and you’re all set.
Via Instructables
Ultimate Toy Storage
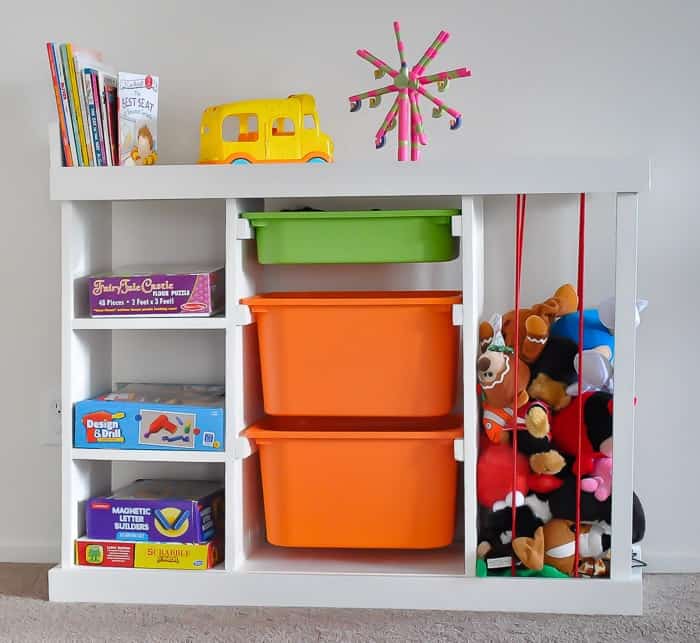
So this one is pretty much the ultimate in toy storage. You’ve got slots for your storage bins, a section for those stuffed animals, shelves for games and books, and a desk top your kid can use for playing, coloring, or working on homework.
The DIY tutorial is pretty easy to follow and includes really clear instructions, photos, and illustrations to make it as easy as possible. You’ll need a Kreg jig, circular saw, and miter saw and drill, plus the wood supplies and fasteners.
Via Anikas DIY Life
Stackable Wooden Toy Bins
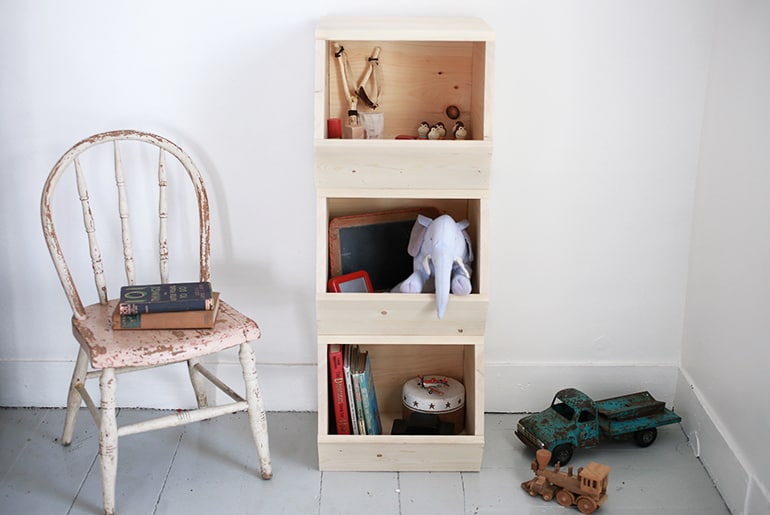
These attractive wooden toy bins are the perfect organizer for the family who has a “public” play area. They’re easy to build, really attractive, and easy to customize for your space. You can make as many as you need to stack up as much as you want.
To make these beautiful bins, you’ll need a sliding miter box saw, a table saw, some wood glue, nails and a nail gun, sandpaper, mending plates, and a screwdriver.
Recycled Old Tire Toy Shelves
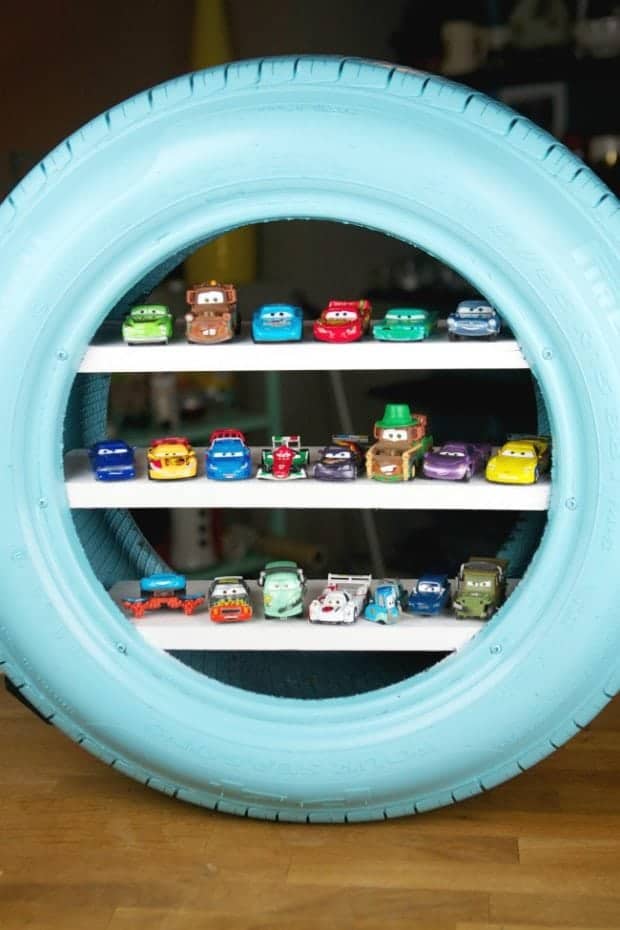
For the fans of the upcycling/recycling movement, you’ll love this project. Not only does it reuse something that would otherwise stink up the landfills and worsen the environment, but it’s really cheap, fun, and unique for the kids’ play area.
You’ll need an old tire, pine board, Panhead screws, quick-dry gray paint primer – for plastic – and quick-dry spray paint – also bonds to plastic – in your color choice. Follow the super easy instructions, and basically, in the matter of drying time, you’ll have this one set to go.
Via Spaceships and Laser Beams
Light-Up Truck Grille Toy Organizer
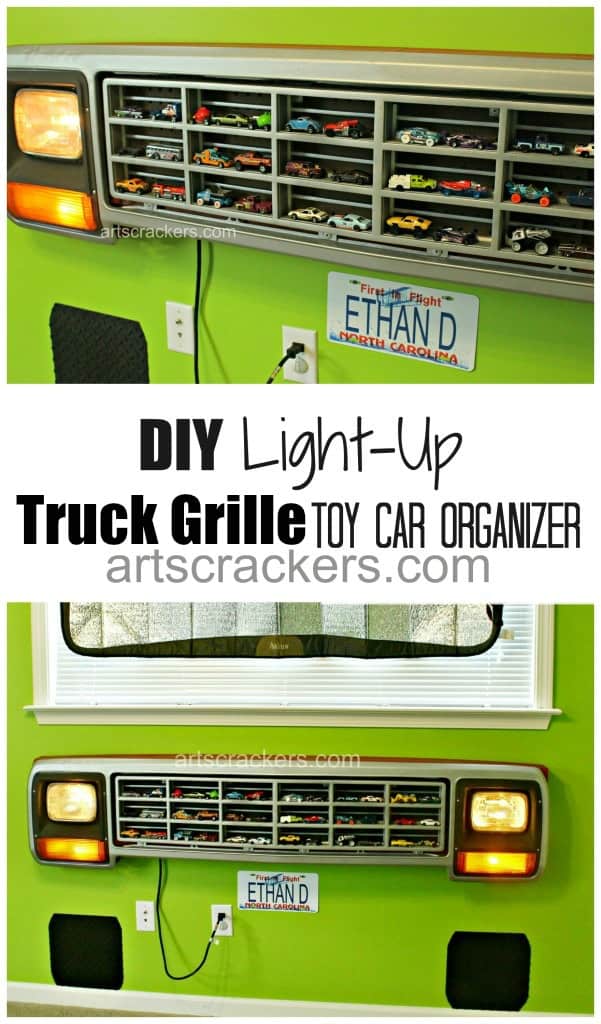
Here’s the perfect choice for the child who loves cars and trucks. Not only will it help the kids display their favorite toys, but it incorporates elements of a real truck into the décor for that unique touch the child will be thrilled to use and show off to all her friends.
You’ll need to visit the junkyard and find an old truck grille with lights. From there, you’ll need some screws, anchors, shelf hangers, headlamps that fit, wood board, long bolts, and some basic tools, including a blow torch.
Via Arts Crackers
Personalized Wooden Toy Box
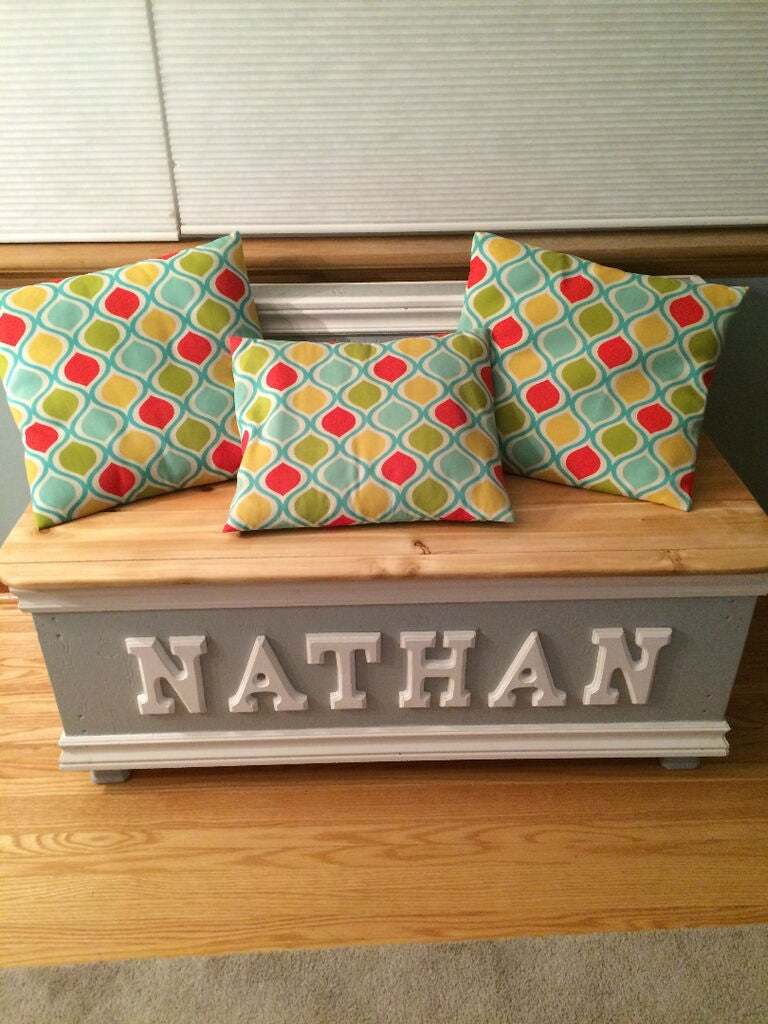
This beautiful toybox is perfect for the child who loves personalization and pretty things. The wooden box is designed fairly simply but incorporates special details that take it from plain to dazzling and fun.
The creator intended the toybox to be beautiful and functional, and easy to make with basic power tools that most beginner woodworkers would already have on hand. You’ll need a miter box and fine-tooth handsaw, a circular saw, drill, sander, and basic safety gear.
Via Instructables
Giant Wood Blocks Toy Box
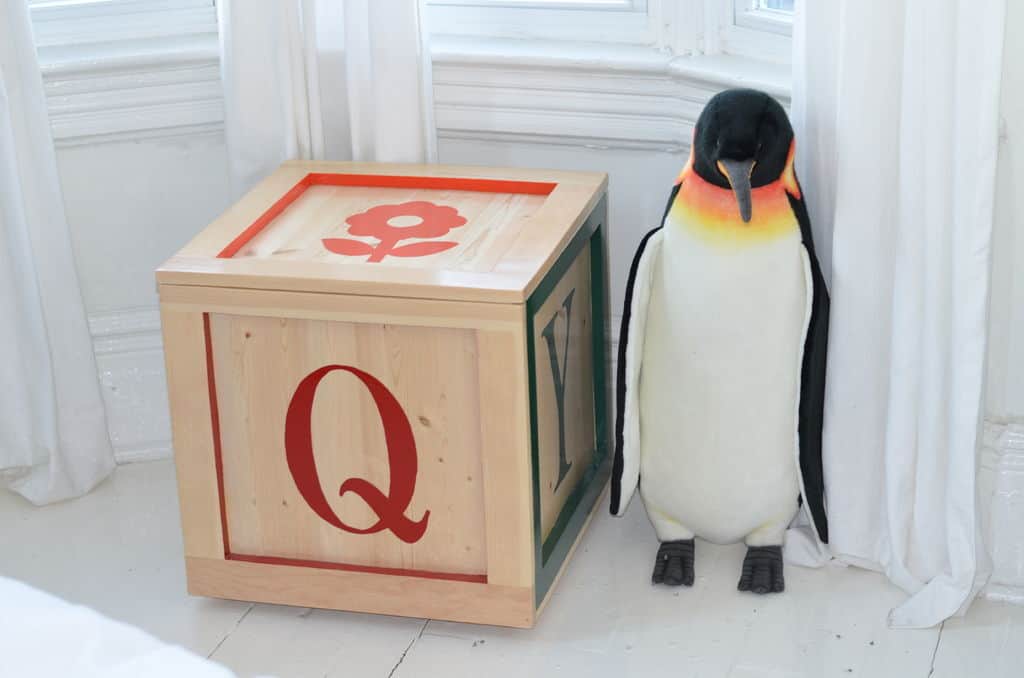
Remember those old stackable wooden blocks with letters and numbers on them? Well, this toy box is the blending of the toy with the storage needed for those blocks into one fun organizing unit. You’ll be able to customize it perfectly for your child’s name and favorites, too.
To make this one, you won’t need extensive woodworking knowledge, but you will need a miter saw, cordless drill, rotary sander, and other basics like clamps, wood boards, quarter round molding, a piano hinge, castors, paint, and transparent plastic letter-sized sheets.
Via Instructables
Comics Chalkboard Toy Box

If your kid loves comic books and drawing, this is the perfect toybox for your home. It combines upcycling of old comic books – double-check the value on them before you cut them up, though! – and a chalkboard top into a super fun toybox for the kiddos.
You’ll need a circular saw or drop saw, a drill, orbital sander, and basic painting supplies. You’ll need that comic book collection, some wood glue, and chalkboard paint, too. In an afternoon, you’ll have this toybox all ready to go.
Via Instructables
Toy Box and Desk Combo
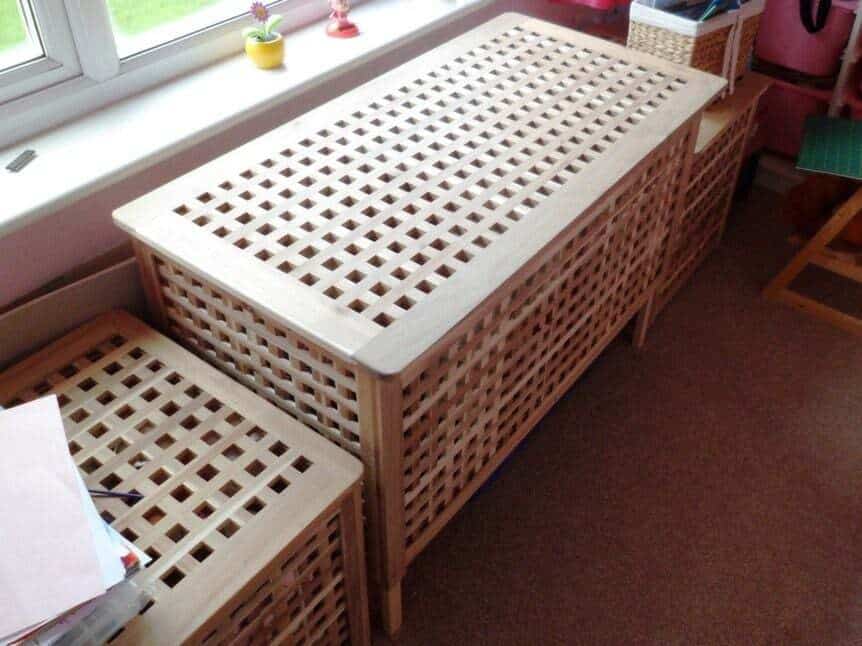
This unique toybox and desk combination is a beautiful design that doesn’t look like anything else you’ve seen. It uses a unique open-square design that’s absolutely beautiful. And then mixes in the functionality of the desk and toybox to help your growing child get and stay organized.
To make this, you’ll start with a HOL storage box – or another large wooden storage box with a hinged lid – some planed softwood, and basic fasteners. The design is pretty easy, too, so almost anyone can do it.
Via Instructables
Lego Table and Storage Center
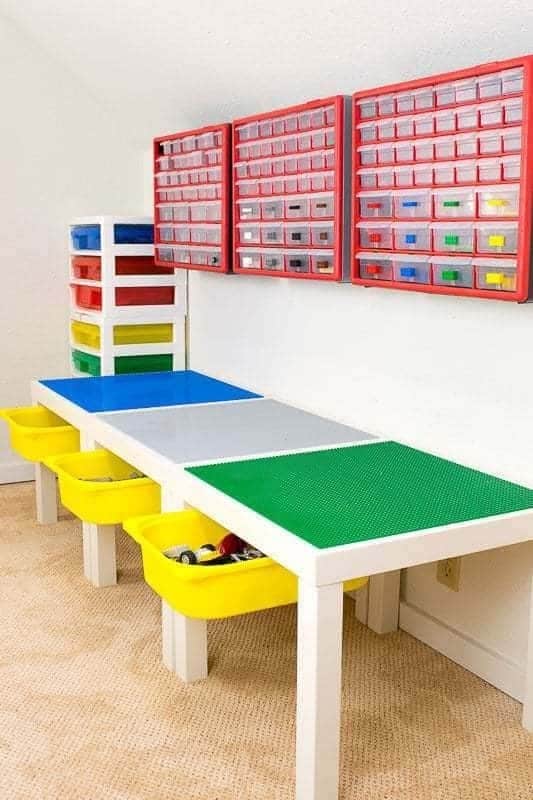
Got a billion Legos lying around the house? Wish your kid had someplace specific to play with them and keep them? Then this is the project for you. It combines the fantastic storage with an open workspace for easy fun building off the floor – hopefully saving your feet from the painful little blocks.
To make this, you’ll upcycle some Ikea products – the Lack table and Trofast bins – and combine them with some Lego base plates.
Galvanized Toy Tub Bench
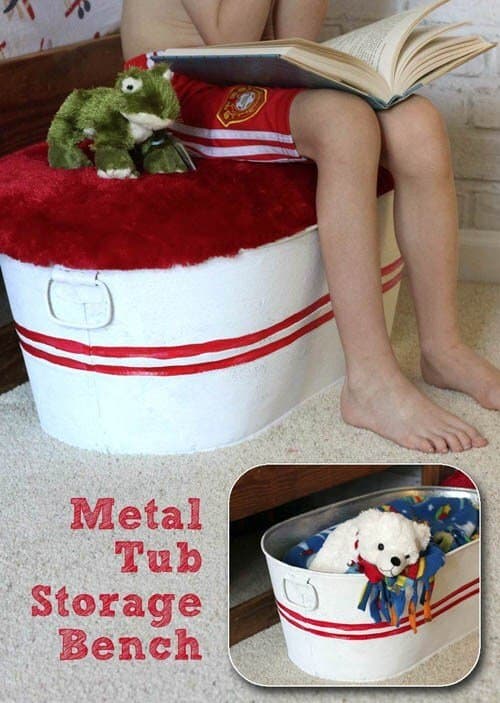
This is a super cute, multi-functional toybox that your kids will love using in their rooms. You’ll convert an old galvanized tub into a toy bin that also works as a soft bench for sitting or a stool for adding a little height in the bathroom, or wherever your child needs a boost.
The project is very easy to build. You’ll just need the supplies – the galvanized tub, some plywood and lumber, upholstery foam, and furry fabric – and a Jigsaw.
Personalized Transfer Toy Box Makeover
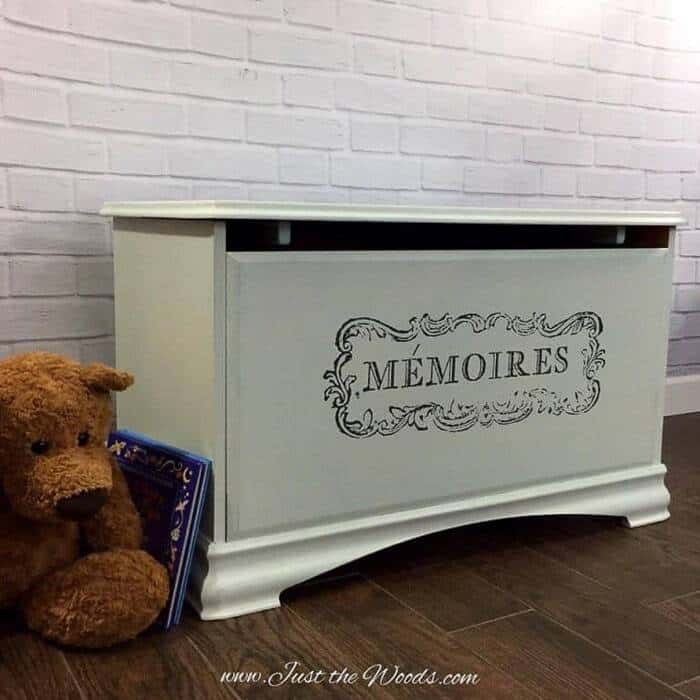
This is the perfect upgrade for your basic toybox into something beautiful and unique. So, whether you’ve got an old toybox that needs a makeover, a cheap toybox that just isn’t that good looking, or you just want to make the box personalized, this project is for you.
You’ll need a toybox, some sandpaper, transfer paper, and some Chevron fabric. That’s it. Just follow the instructions and in an hour or two, you’ll have a beautiful new toybox your whole family will love.
Via Just the Woods
Every Kid Needs a Toybox
The best way to help your kid get organized and you to keep from stepping on tiny shoes and plastic blocks is having a toybox. And whether you love an old-fashioned wooden chest, a fun and colorful toy within a toy, or something more basic, take a look and decide what you’re up for.
Most of these tutorials are for full-on construction projects, so be sure to read the full instructions ahead of time to make sure you’ve got the full list of tools and supplies on hand. Once you’ve done that, choose your colors and any bonus items – like stencils or transferables – and get ready to have some fun.